Here is the DVD cover I designed for the Advertisement Production assignment we had this semester. I used Photoshop and some screen shots and photos taken during filming.
Showing posts with label Photoshop. Show all posts
Sunday, May 29, 2011
Thursday, March 10, 2011
Final Infographic
This is the final version of my Infographic. I changed the background colour and some of the text colours as I was told that the purple and green in the previous one were too strong ;)
This is the more subtle (and final!) version
Wednesday, March 9, 2011
Infographic
I created my Infographic about Graphic Design using Adobe Photoshop CS4 as I haven't grasped Adobe Illustrator very well yet. This helped me get more familiar with Photoshop tools, especially when creating Paths with the Pen Tool. Here below are some screenshots of the editing process;
Blog banner!
I wanted to create something simple as my first blog banner. I followed a tutorial from a magazine called Photoshop Creative to try and create a lighting effect around the text using paths, brushes and changing the opacity. This is the editing process and the final result;
![]() |
| Creating a Path using the Pen Tool |
![]() |
| Adding a Stroke Path using the Brush Tool and the Paths tab |
![]() |
| Adding more stroke paths using different colours and changing the blending options |
![]() |
| Adding Red and Yellow highlights |
![]() |
| Adding white highlights and changing opacity |
![]() |
| Final Result! |
Monday, March 7, 2011
Photo Montage!
In one of our previous Photoshop lessons, we also learnt how to create a collage; having multiple images and putting them together to create just one. I used the following three images to create my collage:
![]() |
| Coffee |
![]() |
| Wood Tabletop |
![]() |
| Notebook |
First, I removed the background of the cup of coffee. I placed it on the wood tabletop image and added a Curves layer mask to add a shadow. I did the same thing with the Notebook image and the final result is the following;
Saturday, February 19, 2011
Colours Your Life!
This week's Photoshop lesson regarded giving colour to Black & White photos. We used the same photo we had retouched ourselves in last week's lesson. We selected the particular areas of the photos to which we wanted to give a particular colour using masks which is a very easy and non-destructive way of editing a photo. Here below is the end result..
![]() |
| Before |
![]() |
| After |
Wednesday, February 16, 2011
First Attempt at Photo Retouching
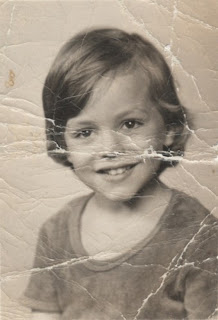
In one of our first Photoshop lessons at school, we were introduced to two tools used for Photo Retouching; the Clone Stamp Tool and the Spot Healing Brush Tool.
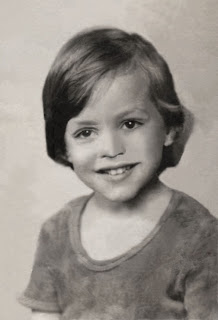
Each one of us then started to restore an old photograph and here below is the result of my very first attempt at photo restoration using the Clone Stamp Tool and the Spot Healing Brush Tool. Furthermore, I arranged the hue/saturation and the levels so that the end result is in black and white.
![]() |
| Before |
![]() |
| After |
Subscribe to:
Posts (Atom)